


Introduction
REST APIs, or Representational State Transfer APIs, are a popular way of building web applications and services. REST APIs are designed to work with HTTP, the protocol used by the web, and use a set of simple, standardized methods to perform common operations like creating, reading, updating, and deleting resources(CRUD operations).
In this article, we will explore how to create a REST API using Node.js and MySQL. We will walk through the entire process, from setting up the development environment to building and testing the API endpoints.
Node.js is a cross-platform, JavaScript runtime environment that executes JavaScript code outside of a web browser. It allows developers to use JavaScript on the server side to build scalable, high-performance applications.
Let's get started!
Application set up
To get started we need to set up our development environment and install essential packages/ tools that we need in our application.
run npm init on the directory, you want to create your application to initiate a node project and select a name for your project and all other details you need for your project.
Typescript setup
We shall use typescript in this project so you could also run npm install -g typescript this will install typescript globally if it's not already installed on your machine. After successful installation, run tsc --init in your project root directory to generate a ts-config.json file that will hold our typescript compiler configuration settings.
You might want to tweak the config file to your liking, for example, you might want to set the javascript version emitted by typescript to es6 by changing the target flag to "target": "es2016".
You can also specify the build folder for javascript files by changing the outDir flag which specifies the directory the typescript compiler will emit javascript files after a successful build "outDir": "./dist"
You can also specify the root folder of your source code using "rootDir": "./src"
Another config flag we can use is "strict": true it enables strict type-checking and enforces stricter rules during the compilation process. It helps developers from making mistakes and writing more robust and maintainable code for easier scaling.
Express setup
we also need to install Express to use the Express framework in developing our application, we do this the usual way by running npm install express --save and also installing @types/express as a development dependency by running npm install --save-dev @types/express for the TypeScript compiler to understand the types and interfaces provided by Express and we also do this for other packages we use in our application. We also install the body-parser to parse our server requests npm i body-parser we also install the types npm install --save-dev @types/body-parser . After you are done with this installation you are good to go, let's work on our application entry point next.
Models Routes Controllers
In this section define our application structure, we shall separate our application into three components:
Models - models handle the data layer of our application, in this case, our CRUD(create, read, update, delete) operations methods will be in our model files, you can have all methods that will interact will the database in the models files.
Controllers- controllers are responsible for handling the business logic of our application, they also serve as an intermediary between the models and the routes, it receives data from the models and serve the routes or the views and vice versa.
Routes- we shall have routes that will expose the endpoints for our API functions. Important to know, in typical node js applications following the MVC pattern, we have a views folder containing the UI files that will be rendered when their corresponding paths are called, this can be done using HTML templating engines but that is beyond the scope of this article.
We shall also have our application entry point and a couple of other files and folders, let's dive in.
To begin building our application create the following folders, Models, Controllers, and Routes and the root folder create your app entry point, I will call mine server.ts
import express from "express";
import bodyParser from "body-parser";
import { Request, Response, NextFunction } from "express";

const app = express();

app.use(bodyParser.json());
app.use(bodyParser.urlencoded({ extended: true }));

app.use((req, res, next) => {
  res.setHeader("Access-Control-Allow-Origin", "*");
  res.setHeader(
    "Access-Control-Allow-Methods",
    "OPTIONS, GET, POST, PUT, PATCH, DELETE"
  );
  res.setHeader("Access-Control-Allow-Headers", "Content-Type, Authorization");
  next();
});

app.listen(3000, () => {
  console.log("we are server is running at port 3000");
});
We initialize our express application in this file by calling express(). We then tell Express to use the body-parser as a middleware to parse JSON data and URL-encoded data in our requests.
We also set headers for our requests, the "Access-Control-Allow-Origin" define which origins, that is ports or domains that can access our server, setting "*" means we allow traffic from anywhere, this is not recommended in production environments. The "Access-Control-Allow-Methods" dictate which operations are allowed in our toutes and the "Access-Control-Allow-Headers" dictate which headers are allowed by the origin, in our case we allow Authorization headers and Content-type.
Finally, we expose our server to a port using the app. listen method.
Connecting to our MySQL database.
Let's create another folder which I will call configs, the naming is up to you, and let's create a DB-conn.ts file in which we shall create a db connection. run npm i mysql2 , mysql2 is a package that allows the creation of connection pools to interact with the MySQL database. In the root directory create a .env file that will hold the environment variables that we need for our db connection options.
HOST=127.0.0.1
DB_USER=root
DB_PASS=<your password>
DB_NAME=<your db name>
DB_PORT=3306
import mysql from "mysql2";

type query = string;
type callback = (error: Error | null, result: { rows: any }) => void;

class DBConnection {
  public db: mysql.Pool;

  constructor() {
    this.db = mysql.createPool({
      host: process.env.HOST,
      user: process.env.DB_USER,
      password: process.env.DB_PASS,
      database: process.env.DB_NAME,
      port: +process.env.DB_PORT!,
    });

  }
  query(
    query: query,
    values: Array<string | number > | null,
    callback: callback
  ) {
    this.db.getConnection(function (err, connection) {
      if (err) {
        console.log(err);
        connection.release();
        throw err;
      }
      connection.query(query, values, function (err, rows) {
        connection.release();
        if (err) {
          callback(err, { rows: rows });
        }
        if (!err) {
          callback(null, { rows: rows });
        }
      });
      connection.once("error", function (err) {
        console.log("last", err);
        throw err;
      });
    });
  }
}

export default new DBConnection();
To interact with a MySQL database in our Node.js application, we can create a DB Connection using the mysql2 package. The first step is to instantiate a connection pool using mysql.createPool(). This connection pool provides us with a pool of database connections that can be reused across multiple functions.
We have a class method called query that allows us to execute MySQL statements. This method expects three parameters: the query itself, which should be a string representing a valid MySQL statement, an optional array of values to be substituted in the query, and a callback function to handle the result or error.
The mysql2 package provides us with useful functions. For example, the getConnection() function retrieves a connection from the pool. We can then use the connection.query() function to execute a statement using that connection. After we're done with the connection, we release it back to the connection pool using connection.release(). In case of any connection errors, we can utilize connection.once to handle the error.
By using this approach, we can efficiently manage our MySQL connections, leverage connection pooling for better performance, and execute queries securely. This helps us ensure reliable communication with the database and handle any errors that may occur
Now that we are all set for our db connection let's create our models and see if the connection is working.
Models
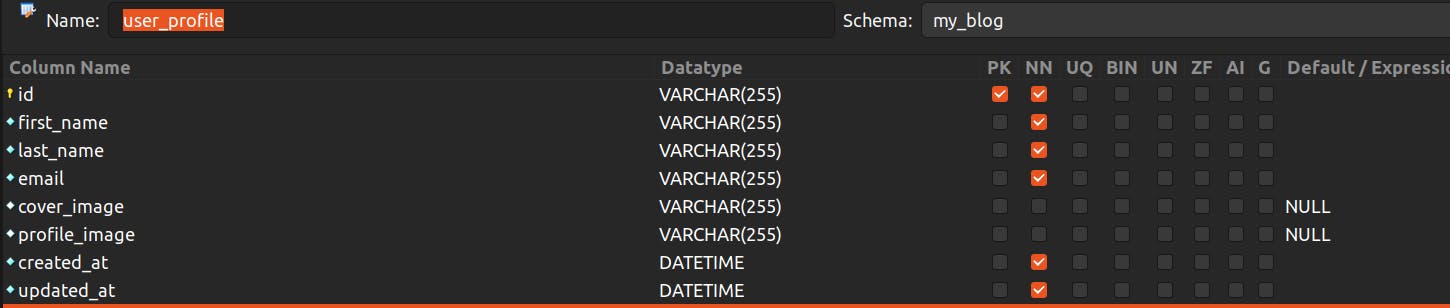
To create our database, head to MySQL workbench, create a new schema and the name is up to you, I named mine "my_blog", you should then create two tables with the structure in the images below.

After your database is set, create out user.ts file in models, and let's implement a class User with methods for the data functions.
import sql from ".././config/db-config";

export class User {
  id: string;
  first_name: string;
  last_name: string;
  email: string;
  password: string;
  username: string;
  cover_image_url: string | null;
  profile_image_url: string | null;

  constructor(
    id: string,
    first_name: string,
    last_name: string,
    email: string,
    password: string,
    username: string,
    cover_image_url: string | null,
    profile_image_url: string | null
  ) {
    this.id = id;
    this.first_name = first_name;
    this.last_name = last_name;
    this.email = email;
    this.password = password;
    this.username = username;
    this.cover_image_url = cover_image_url;
    this.profile_image_url = profile_image_url;
  }

  async save() {

    return new Promise(async (resolve, reject) => {
      sql.db.getConnection((err, connection) => {
        if (err) {
          reject(err);
        }
        connection.beginTransaction((err) => {
          if (err) {
            reject(err);
          }
          const profileQuery = `INSERT INTO user_profile (id, first_name, last_name, email, cover_image, profile_image, created_at, updated_at) VALUES (?, ?, ?, ?, ?, ?, NOW(), NOW())`;

          const credentialsQuery = `INSERT INTO user_credentials (user_id, username, password) VALUES (?, ?, ?)`;


          connection.query(
            profileQuery,
            [
              this.id,
              this.first_name,
              this.last_name,
              this.email,
              this.cover_image_url,
              this.profile_image_url,
            ],
            (error, results, fields) => {
              if (error) {
                connection.rollback(() => {

                  connection.release();
                  reject(error);
                });
              }


              connection.query(
                credentialsQuery,
                [this.id, this.username, this.password],
                (error, results, fields) => {
                  if (error) {
                    connection.rollback(() => {

                      connection.release();
                      reject(error);
                    });
                  }

                  connection.commit((error) => {
                    if (error) {
                      connection.rollback(() => {

                        connection.release();
                        reject(error);
                      });
                    }
                    connection.release();
                    resolve({ message: "user saved ok " });
                  });
                }
              );
            }
          );
        });
      });
    }).catch((err) => {
      const error = { code: err.code, failed: true, message: err.sqlMessage };
      throw error;
    });
  }
}
We start by importing our DB connection by importing sql from our config file.
We then initialize our class User and pass a constructor so that we can create an instance from our controllers, we then create a method save(). It's good practice to wrap your queries in a transaction if you need to insert data to more than one table in an operation so if one query fails we can roll back the previous query to ensure data integrity and atomicity. We access our connection pool by calling sql.db and we get access to mysql2 getConnection(), which takes two arguments, an error, and a connection, if we have no error we access the connection and call beginTransaction(), we shall then call rollback() in case of any error throughout the transaction, we then commit the transaction if we get no error.
Let's create a method for updating user details :
  static updateUserDetails = async (
    userDetails: UpdatedUserInterface,
    id: string
  ) => {
    const {
      first_name,
      last_name,
      email,
      username,
      hashedPw,
      cover_image_url,
      profile_image_url,
    } = userDetails;

    var query: string;
    var values: Array<string | null>;

      query = `UPDATE user_profile SET first_name = ?, last_name= ?, email= ? , profile_image = ?, cover_image = ? WHERE id="${id}" `;
      values = [
        first_name,
        last_name,
        email,
        profile_image_url,
        cover_image_url,
      ];
    }
    var credentialsQuery = `UPDATE user_credentials SET username = ?, password = ? `;

    return new Promise((resolve, reject) => {
      sql.db.getConnection((err, connection) => {
        connection.beginTransaction((err) => {
          if (err) {
            reject(err);
          }
          connection.query(query, values, (error, results, fields) => {
            if (error) {
              connection.rollback(() => {

                connection.release();
                reject(error);
              });
            }

            connection.query(
              credentialsQuery,
              [username, hashedPw],
              (error, results, fields) => {
                if (error) {
                  connection.rollback(() => {

                    connection.release();
                    reject(error);
                  });
                }
                connection.commit((error) => {
                  if (error) {
                    connection.rollback(() => {

                      connection.release();
                      reject(error);
                    });
                  }
                  connection.release();
                  resolve({ message: "user updated ok " });
                });
              }
            );
          });
        });
      });
    }).catch((err) => {
      const error = { code: err.code, failed: true, message: err.sqlMessage };
      throw error;
    });
  };
We create a static update method, meaning we can call this method directly without creating a new Instance of the class. The function expects two parameters, an object with the user details and the user id, the transaction executes to update the user details on both user tables.
Next we shall handle deleting from the database
 static deleteUser = async (id: string) => {
    const query = `DELETE FROM user_profile
    WHERE id = "${id}"`;
    return new Promise((resolve, reject) => {
      sql.query(query, null, (err, results) => {
        if (err) {
          reject(err);
          return;
        }
        resolve(results);
      });
    }).catch((err) => {
      const error = { code: err.code, failed: true, message: err.sqlMessage };
      throw error;
    });
  };
The delete method is pretty straightforward, we get the user id and we execute a simple SQL delete query.
Let's also create a method that will get the user credentials from the credentials table for a login function that we will implement later
 static async findUserCredentials(id: string) {
    const query = `SELECT * FROM user_credentials WHERE user_id="${id}"`;

    return new Promise((resolve, reject) => {

      sql.query(query, null, (err, results) => {
        if (err) {
          reject(err);
          return;
        }

        resolve(results);
      });
    }).catch((err) => {
      const error = { code: err.code, failed: true, message: err.sqlMessage };
      throw error;
    });
  }
The above method retrieves user credentials from a database based on a given id. The method takes an id parameter, which is used in the SQL query to fetch user credentials for the specified user.
Let's also create a method to find a user by the username that will be utilized during registration to find if a username is available and another to find all users.
 static findUserByUserName(username: string) {
    const query = `SELECT * FROM user_credentials WHERE username = "${username}"`;

    return new Promise((resolve, reject) => {
      sql.query(query, null, (err, results) => {
        if (err) {
          reject(err);
          return;
        }
        resolve(results.rows[0]);
      });
    });
  }

 static findAll = async () => {
    const query = `SELECT * FROM user_profile`;
    var values: Array<string>;
    return new Promise((resolve, reject) => {
      console.log(query);
      sql.query(query, values, (err, results) => {
        if (err) {
          reject(err);
          return;
        }

        resolve(results);
      });
    }).catch((err) => {
      const error = { code: err.code, failed: true, message: err.sqlMessage };
      throw error;
    });
  }
The findUserByUserName the method checks for a user with the username given from the user_profile table in the database. The findAll method retrieves all users registered in the database.
With that, we are done with the model, for now, let's go ahead and implement the controllers
Controllers
Let's create a user.ts in the controller's folder to handle the application logic, let's start with the user registration but before that let's create a types folder where we shall define type interfaces for our application data, in the folder create an IUser.ts file and defined the following type
export interface IUser {
  email: string;
  first_name: string;
  last_name: string;
  password: string;
  username: string;
  cover_image_url: string | null;
  profile_image_url: string | null;
}
import { NextFunction, Response, Request } from "express";
import { User } from "../models/user";
import { v4 as generateId } from "uuid";
import bcrypt from "bcryptjs";
import jwt from "jsonwebtoken";
import { IUser } from "../types/IUser";

export const signup = async (
  req: Request,
  res: Response,
  next: NextFunction
) => {
  const {
    first_name,
    last_name,
    email,
    password,
    cover_image_url,
    profile_image_url,
    username,
  }: IUser = req.body;

  try {
    const usernameTaken = await User.findUserByUserName(username);
    if (usernameTaken) {
      const error = new Error("username already exist");
      throw error;
    }
    const id = generateId();
    const salt = await bcrypt.genSalt(10);
    const hashedPw = await bcrypt.hash(password, salt);
    const user = new User(
      id,
      first_name,
      last_name,
      email,
      hashedPw,
      username,
      cover_image_url,
      profile_image_url
    );
    const userD = await user.save();
    if (!userD) {
      const error = new Error("an error ocurred");
      throw error;
    }
    res.status(200).json({ message: "user saved successfulyy" });
  } catch (error) {
    next(error);
  }
};
Express gives us access to req (Request) an object that contains data of the coming request, res (Response) an object that we can use to send a response, set headers and status codes, and a next function that we can call to invoke the subsequent function or middleware.
In our function, we extract our user details by destructuring the request body, we then check if the username is taken, if it's true we throw an error otherwise continue to the next code block, we generate a user id using uuid, and then hash the user password using bcrypt if it's okay we instantiate a new class instance and access the save method to save data to the DB. we then return a response with an appropriate HTTP status code, response messages, and data as JSON objects.
Let's also create a login function,
export const login = async (
  req: Request,
  res: Response,
  next: NextFunction
) => {
  const { username, password } = req.body;

  try {
    const user = (await User.findUserByUserName(username)) as ISavedUser;
    const isEqual = await bcrypt.compare(password, user.password);
    if (!isEqual) {
      const error = new Error("you have entered the wrong password");
      throw error;
    }
    const token = jwt.sign(
      {
        username: user.username,
        userId: user.user_id,
      },
      process.env.JWT_SECRET_KEY!
    );


    res.status(200).json({ message: "Login successful", token });
  } catch (error) {
    next(error);
  }
};
We first get the user by his username since a username should be unique, after we get the user, we compare the hash password saved in the DB with the password from the request body using the bcrypt compare function with should return a truthy or false value. If the value is not true we throw an error and exit else we generate a token using jwt that we send to the client with a success status code.
Let's also work on the update function,
export const update = async (
  req: RequestWithUserId,
  res: Response,
  next: NextFunction
) => {
  const {
    first_name,
    last_name,
    email,
    username,
    cover_image_url,
    profile_image_url,
    password,
  } = req.body;
  const { userId } = req.params;

  try {
    if (!userId) {
      const error = new Error("you are not logged in or session has expired");
      throw error;
    }

    const salt = await bcrypt.genSalt(10);
    const hashedPw = await bcrypt.hash(password, salt);
    const updatedDetails = {
      last_name,
      first_name,
      email,
      username,
      hashedPw,
      cover_image_url,
      profile_image_url,
    };
    const updateResults = (await User.updateUserDetails(
      updatedDetails,
      userId
    ))
    if (!updateResults) {
      const error = new Error("updated failed");
      throw error;
    }


    res.status(200).json({ message: "Updated user successfully" });
  } catch (error) {
    next(error);
  }
};
The logic in this is similar to the creating user function except that instead of creating an instance of the user class in order to save we call the update function directly with the user details as parameters as expected in the updateUserDetails method in the models.
Let's also create a delete function that is pretty simple.
export const deleteUser = async (
  req: Request,
  res: Response,
  next: NextFunction
) => {
  const { id } = req.params;
  console.log(id);
  try {
    const response = (await User.deleteUser(id))

    if (!response) {
      const error = new Error("failed to delete");
      throw error;
    }

    res.status(200).json({ message: "user deleted successdully" });
  } catch (error) {
    next(error);
  }
};
In this function, we extract the user id from the route url using req.params. We then call the delete method with the id as a parameter and we then check if the response is truthy so that we can send the response or throw an error.
export const findAllUsers = async (
  req: Request,
  res: Response,
  next: NextFunction
) => {
  try {
    const response = (await User.findAll())
    if (!response) {
      const error = new Error("could not fetch users");
      throw error;
    }

    res
      .status(200)
      .json({ message: "found all users", response: response.rows });
  } catch (error) {
    next(error);
  }
};
We also implement a controller function to get all users, this does not require a parameter we shall just call the findAlL method in the user model.
That is it for the controllers, let's work on the routes
Routes
Routes are generally URLs / endpoints through which we expose our API functionality. Express has a Router() function that we utilize to create these endpoints. let's create our user routes below.
import { Router } from "express";
import {
  signup,
  login,
  update,
  deleteUser,
  findAllUsers,
} from "../controllers/user";


const router = Router();

router.post("/signup", signup);
router.post("/login", login);
router.put("/update-details/:userId", update);
router.delete("/delete-user/:id", deleteUser);
router.get("/all-users", isAuth, findAllUsers);

export default router;
In Express.js, we can create a router object by executing const router = Router();. This router object allows us to define routes and their corresponding handlers.
The router object provides various HTTP methods, such as get(), post(), put(), delete(), etc., that we can use to define routes for different HTTP request types. We specify the URL or route path as the first parameter of the method, and a controller function that will be executed for that route as the second parameter.
For example, to handle a POST request to the '/users' endpoint, we can define the route using router.post('/signup', signup), where signup is the function that will handle the request and send the response.
Once we have defined our routes on the router object, we can export the router using module.exports = router;. This allows us to import the router in our application entry point (e.g., the main server file) and mount it using app.use(). By mounting the router, we make the defined routes accessible in our application, below is how we shall do it in our server.ts
import express from "express";
import bodyParser from "body-parser";
import userRoutes from "./routes/user";
import * as dotenv from "dotenv";
import { Request, Response, NextFunction } from "express";

dotenv.config();

const app = express();

app.use(bodyParser.json());
app.use(bodyParser.urlencoded({ extended: true }));

app.use((req, res, next) => {
  res.setHeader("Access-Control-Allow-Origin", "*");
  res.setHeader(
    "Access-Control-Allow-Methods",
    "OPTIONS, GET, POST, PUT, PATCH, DELETE"
  );
  res.setHeader("Access-Control-Allow-Headers", "Content-Type, Authorization");
  next();
});
app.use(userRoutes);


app.listen(3000, () => {
  console.log("we are server is running at port 3000");
});
After defining our router object, we can import it into our main server file and use it to expose our endpoints by passing it to app.use() as middleware. Let's test our application endpoints using Postman
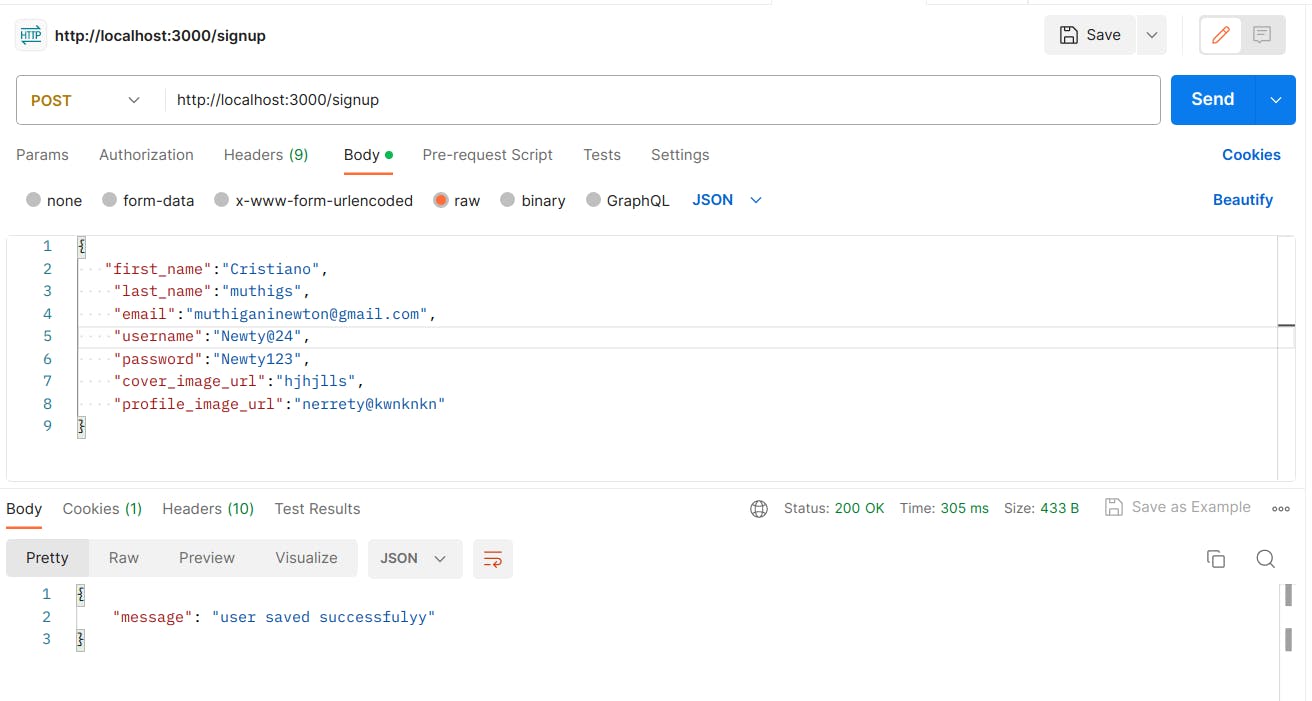
For the user register, we get a successful response

For the Login, we also get a successful response

The delete request we also get a successful response
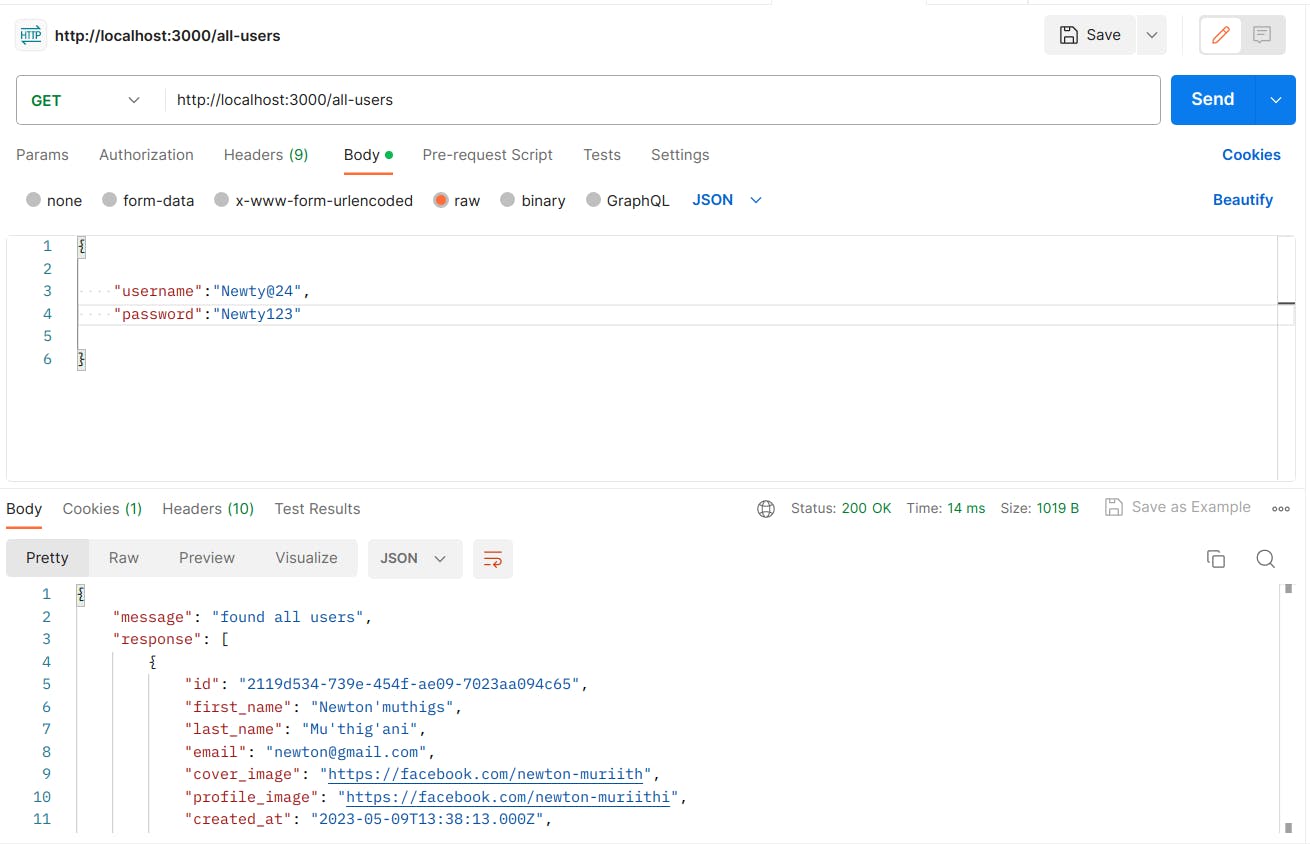
We also, get a successful response on getting all users
Also, view the full implementation of the API on GitHub here
Conclusion
we have explored some key concepts of the Express framework. Express is a widely adopted framework that simplifies the process of creating robust and scalable APIs.
The purpose of this article was to provide a simple but detailed introduction to REST APIs using Node.js and Express. By understanding the benefits of Express and its compatibility with the Node.js ecosystem, you are equipped to build robust and efficient APIs. Stay tuned for more insights and updates as we continue to explore topics such as authentication, authorization, and sessions, further enhancing the functionality and security of your REST APIs.
Happy coding!